

24 May 2021
I have created a Blender plugin that takes an image texture with some structure and generates an animation of how this structure grows. To be more precise, it creates a non-color data image with the animation information that can be used in a shader. Since animations are hard to describe in words or individual images, I highly recommend the video describing this plugin.
If you are only looking for specific information or the download of the plugin, have a look at this article. It serves as the documentation, but it will have only little explanation of how the plugin works and how the results can be used. Refer to the video for these details and to see how the plugin is used in Blender as shown in the actual Blender user interface.
You can get the Blender plugin1 from my github repository. Just download the py-file in the growth-image repository and save it wherever you like. Since this article might be interesting to others than my usual audience, a little hint to those not familiar with github: Click the file and when you see the source code right-click on the “Raw” button in the top-right corner and select “save link as…” (or similar, depending on language and browser).
In Blender, open up the preferences dialog, switch to the Add-ons section and pick the Install… button in the top-right corner. Navigate to wherever you saved the py-file and double click it. Important: It should now show growth image in the list of plugins, but it is not yet activated. You need to check the box next to it to actually enable the plugin.
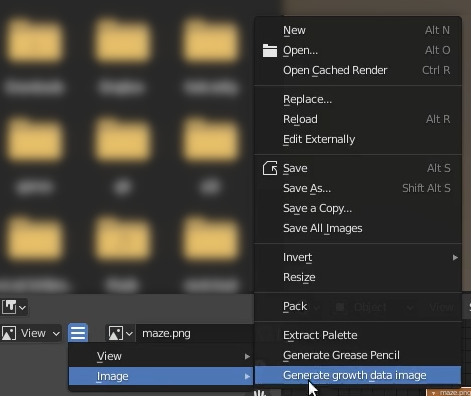
The plugin only adds a single function to blender, called generate growth data image. This function can be found in the Image-menu of the image editor, which in turn can be found on the UV editing workspace, the texture paint workspace or the shading workspace. Pretty much in any place, where you can select and view your loaded images.
Warning: At the time of this writing, the computations of the plugin cannot be canceled. Usually, they are done in under a minute, but if you want to process particularly large images or use a large influence radius (see below) the processing can take significantly longer. If it takes too long, your only option is to kill Blender, so please make sure to save your work before getting too experimental.
Ok, it is a bit strange to give installation instructions before explaining what it does. But I suspect that quite a few users will have a look at the video to get an idea what it does and only visit this article to get the plugin itself. So, sorry about that and thanks for reading on. But, truth being told, it is easier to convey how to use it in moving images, so I would once again recommend the video on youtube. If you prefer text, let me at least show you an example result:
The idea is that you have some kind of image texture that shows a structure with a bunch of paths, like the maze in the example above or tracks on a PCB2 and feed this to the plugin. It will create an animation of how these paths grow and store the animation data in a second image3 using non-color data. You can load this generated image into a shader and use its blue channel to animate various properties of your shader. The blue channel contains a timestamp, so add a value input to your shader as a reference timestamp (i.e. animate it with keyframes) and compare the blue channel of the generated image to this timestamp to influence properties of your shader.
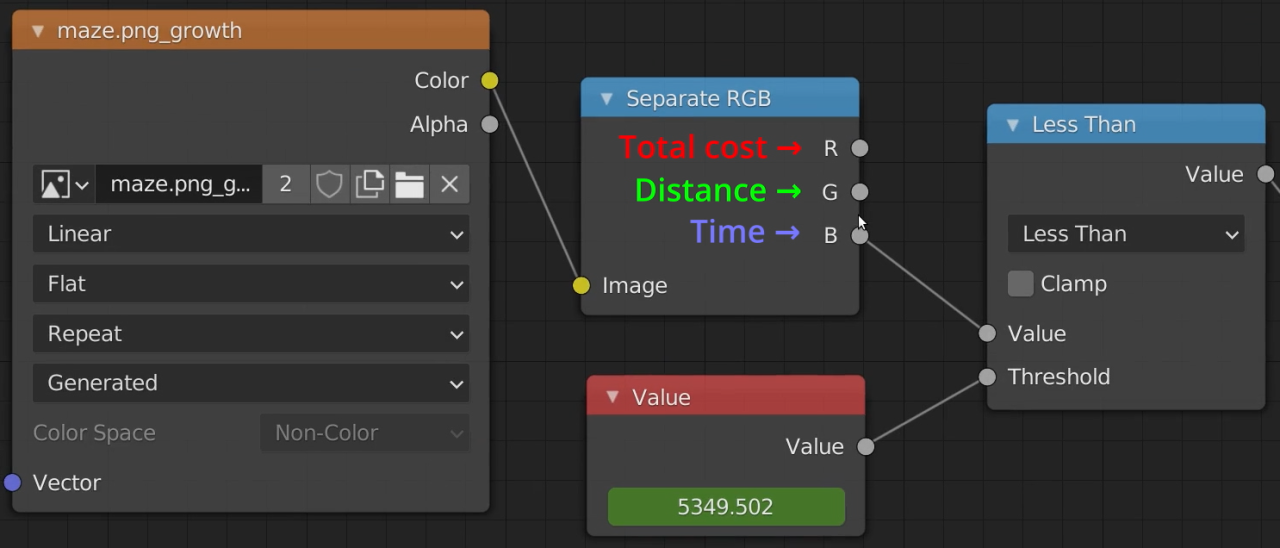
You can see an excerpt of a shader comparing the blue channel to an animated value above. Again, see the video for a detailed example.4
The growth animation is based on a path finding algorithm called A* (A star). From a starting point it calculates the path to each pixel with the lowest cost. The cost is just a value that you can associate to each pixel and the cost of a path is the sum of all the costs for the pixels along that path. For example, you can define that a white pixel costs 1 while a black pixel costs 5. A path over four white pixels would cost 4 and is preferred over a (shorter) path of a black and a white pixel with a total cost of 6. So, in this example, black pixels act as “walls”, although weak ones. If crossing a black wall costs 5, the algorithm will still cross that wall if the alternative would be a detour of 6 white pixels with a cost of 1 each.
The default value of the plugin for the cost of black pixels is 1 million, so by default the algorithm should only cross the walls as a last resort if no alternative path exists. Depending on your goals and your reference image, you can of course adjust this behavior in the options (see below).
As mentioned above, the output is an image with non-color data. Still it uses the red, green and blue channels that need to be separated in Blender. In most cases you would use the blue channel as it contains a timestamp for animations. Depending on how you set up the time per pixel (see below), this timestamp can be compared to animation frames, but most of the time it is just an arbitrary value and you would animate a reference timestamp.
The other channels contain additional data from the path finding algorithm. Red contains the total cost to get to each pixel, which could theoretically be used for the animation as well. The downside of doing so is that giving a high cost penalty for crossing walls (like the default of one million) will also block your animation in situations in which crossing a wall is unavoidable. So, setting a low animation delay but high cost for walls is usually preferable.
Finally, the green channel contains the total distance along the path with lowest total cost to each pixel. This can be helpful to change properties along these paths like a color changing with the distance traveled.
Finally, let’s have a look at the individual options that pop up when generating the growth image:

Origin is a simple 2D vector ranging from (0,0) to (1,1). It describes the starting point of the growth within the source image and it works similar to UV coordinates. So, the default value of (0.5, 0.5) is in the center of the image.
Influence radius sets which pixels are considered to be “neighbors” in the path searching algorithm. The distance to the next pixels (above, below, left and right) is 1. The diagonals would be 1.41 (square root of 2) and the next ones along a straight line would be 2. It is the actual distance in pixels.
The point of this setting is that allowing only the next neighbors heavily emphasizes horizontal and vertical movement as diagonals can only be achieved by moving two pixels. The result is that a growth animation without nearby walls has a diamond shape.
Increasing the influence radius gets rid of the diamond shape with two downsides: The calculation can get much slower5 and the paths can skip walls that are thinner than the influence radius.
Reference channel determines if the red, green, blue or alpha channel is taken from the source image. On a black and white image (as used in the examples above) this does not matter, but on images not designed for this purpose, you might want to think about which channel to use. The meaning of the channel is also strongly influenced by the next option.
Threshold splits the pixels on the channel picked by reference channel into two sets. Any value on this channel above threshold is treated as one type (for example walls) and any value below as the other type (for example valid paths). Which is which depends on the costs you apply to each with the following options.
Cost above threshold sets the cost for pixels above the threshold value. The default is 1.0, so white pixels would represent paths.
Cost below threshold sets the cost for pixels below the threshold value. The default is 1 million, so black pixels would represent walls.
Time above threshold sets the time for pixels above the threshold value. This can be set independently of the costs and you can use units of your choice.
Time below threshold same as Time above threshold but, well, you might have guessed it, below the threshold.
That’s it for the documentation. I hope you were able to follow, but feel free to discuss it or ask questions on Youtube or Reddit (I will post it in r/blender and r/there.oughta.be). If you find a use for this plugin, I would be happy if you shared the results with me.
Yes, they are called addons. For some reason I am stuck with plugin. Sue me. ↩
This was the inspiration for the addon as I have written it to animate the tracks on the PCB animation for my smart doorbell. ↩
Hence the somewhat awkward name “growth image”. The plugin generates an image describing the growth, a “growth image”. Don’t judge, I am the guy with the strong German accent. ↩
No, I am not pushing the video to get ad revenue. I am not even a Youtube partner (yet?). If I wanted money, I would push my Buy me a coffee link instead ;) ↩
Technically, the number of edges per node on the graph of pixels increases with the square of this radius, so be careful with this setting. ↩